Abstract
Technical description of an Xbox 360 controller. Parts consist of the of parts and sub parts that work in together to provide an ideal and comfortable gaming experience. All the parts provided will show what the controller consists of and also reflect on its design.
History 3
The Xbox 360, during development known as the Xbox Next, Xenon, Xbox 2, Xbox FS or NextBox was first made in February 2003 headed by Microsoft’s Vice President J. Allard. According to hiscoga wordpress The Xbox 360 was released on November 22, 2005, in the United States and Canada; December 2, 2005, in Europe and December 10, 2005, in Japan. It was later launched in Mexico, Brazil, Chile, Colombia, Hong Kong, Singapore, South Korea, Taiwan, Australia, New Zealand, South Africa, India, and Russia. In its first year on the market, the console had launched in 36 countries, more countries than any other console that had launched in a single year. Though the Xbox 360 wasn’t the best-selling console as the seventh generation of consoles but was given the title of most influential because of its detail media distribution and online gaming platform called Xbox Live, and its popularization of game achievement awards. The Xbox 360 controller was the primary controller for Microsoft’s Xbox 360 and was introduced at E3 in 2005 with its wired and wireless versions. The one released in 2005 was mainly white with a grey bottom panel however the glossy black one came out in 2007 the only difference between the two was the color and maintained its comfortable and appealing design for main gamers.
Technical Description
Overview
4
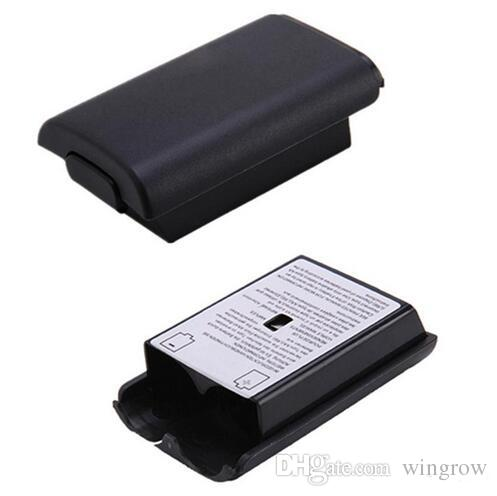
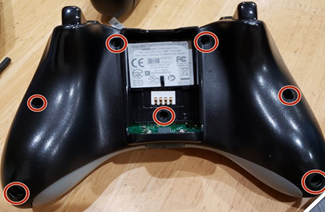
Glossy Black plastic for clean appearance with orange, blue, green, and red buttons. A silver Xbox button. The left analog stick placed at a high position close to the left bumper and trigger for optimal reaction time when trigger and bumper are needed. Compared to a PlayStation 3 dual shock controller which has both analog sticks placed at similar positions. There are six black coated stainless steel Torx screws on the rear case and a seventh one behind the battery pack. When screws are removed they make for an easy removal of the rear case. For the controller to work it needs a source of power. Since this is a wireless controller it needs batteries. It requires 2 AA alkaline batteries which provides an optimal 40 hours of continuous playtime. Clip on battery pack for hassle free battery changing. Clip on battery pack provides an easy way to change batteries without the hassle of the battery falling out when removing the cover for batteries in other game console controllers.
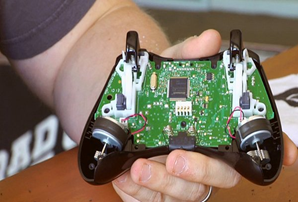

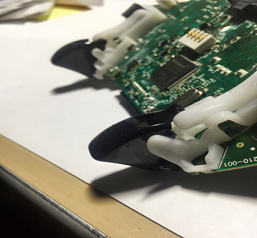
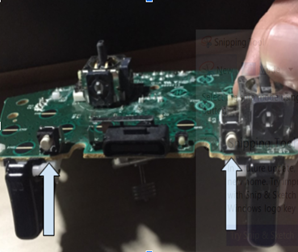
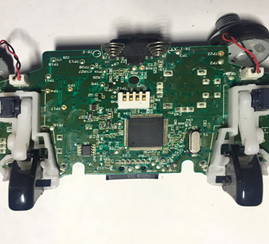
When rear case is removed is shows the inside of the controller. When opened a circuit board is revealed along with two vibration motors that are located in the handles of the controller. For a realistic enjoyable playing experience There are two vibration motors located at the tips of the handles. The right motor has more counterweight then the left motor to make up for the specific design of the controller. This is to provide comfort to the user when using the remote. The motors are attached to the circuit board which triggers the motors whenever certain buttons are pressed or a certain action takes place to keep you alert and reactive. Near the bottom of the remote the vibration motors are connected to the circuit board.

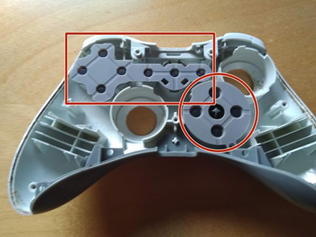
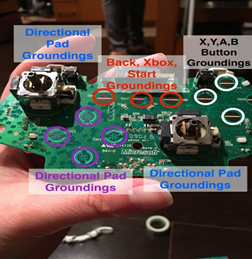
When gaming it is common to dim the light or turn them off however the different colors make it easy to tell them apart in dark environments especially gaming at night. The B, A, X, and Y buttons are on the right and the Xbox, start, and back buttons are located in the middle. The D pad is located to the left next to where the right thumb stick and is usually an extra function. This is to allow for more options when playing a game, since it is not really an effective control button for active gaming. When the buttons or D pad is pressed down it is able to make contact the rubber pads placed between the circuit board and the buttons which then in turn interacts with the circuit board. There are 2 slips of grey rubber that presses against the circuit board when a button is pushed the circuit board reads the input and executes the command The conductive rubber pads press against groundings laid upon the circuit board so when a grounding is pressed down upon in a certain place it executes a command given by the user to the controller and then to the console.
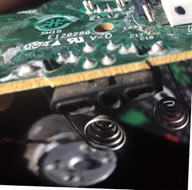
The triggers are glossy black, smooth and to attached part of the circuit board which have springs in them so whenever you press on them, they send commands directly to the circuit
board and resets. The triggers aren’t large and clunky and provide a comfortable place to put your fingers when playing. The bumper panel is located between the front and rear case and directly on top of the triggers on the circuit board. The location of the bumpers makes it comfortable when transitioning from the triggers to the bumpers and to the analog sticks. When the bumpers are pressed down it pushes buttons that are directly attach to the circuit board.
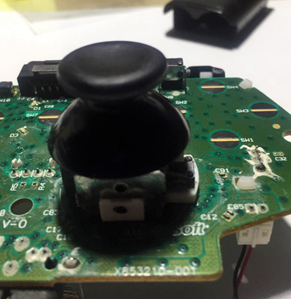
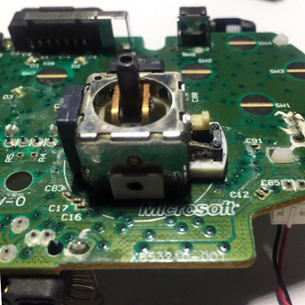
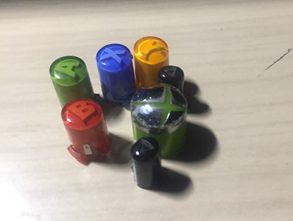
The Left and right analog sticks are mounted onto the circuit board. The left analog stick is placed higher for a comfortable and efficient transitions between different buttons. Consist of a stick in the middle that when force is applied to it, it can move 360 degrees and when let go it defaults to an upright position, also the analog stick can pressed down on which clicks and when playing a game you can assign more features by assigning certain actions to the clicking of the analog stick for efficiency. Analog stick covers are glossy black plastic pieces placed on the analog sticks to make it easier to press down on the analog stick and the tips are covered with rubber to add grip when operating the controller. Black plastic universal audio port (2.5mm) for adapter-free headset connect. This allowed for the use of many microphone but also was perfectly designed for the default Xbox 360 headset.
Conclusion
Gaming on consoles or computers it will only get more advanced and better eventually we won’t need physical controllers to game. As more people get into game and as the industry grows exponentially there will be things that will become obsolete but until then the Xbox 360 wireless controller is very simple but its simple design creates on of the most efficient and comfortable controllers to this day.

This entry is licensed under a Creative Commons Attribution-NonCommercial-ShareAlike 4.0 International license.